
-
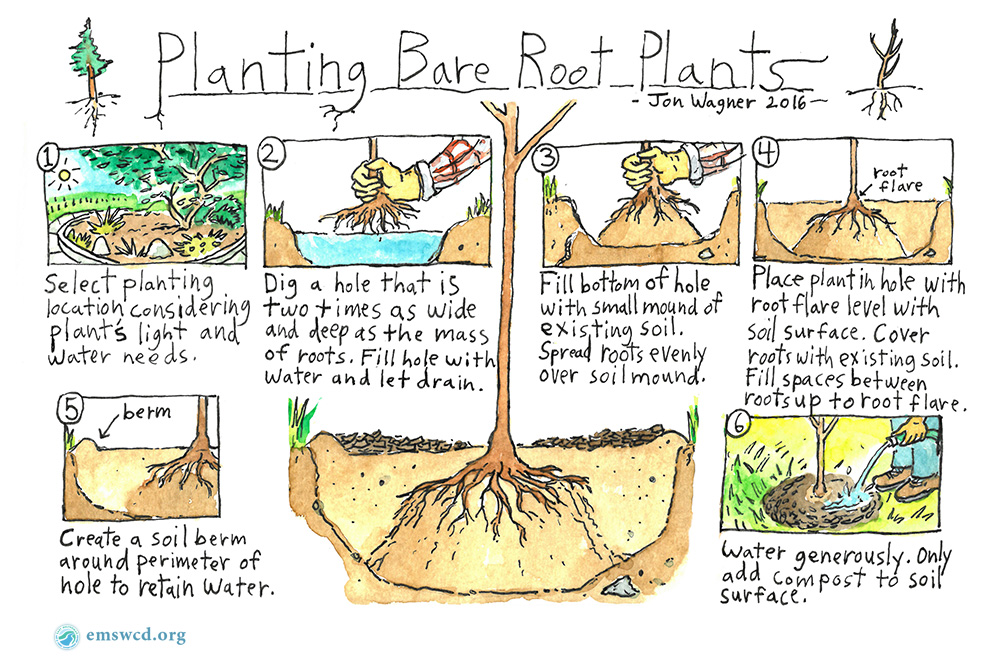
- How to plant bare root plants in six easy steps!
The following simple tips will help ensure that the plants you plant today will thrive for years to come. See detailed instructions below, and be sure to check out the new illustration by our staff Jon Wagner on how to plant bare-root plants!
Preparing the Site
- Clear away all loose materials, such as leaves, rocks and branches, from the area where the hole will be dug.
- Dig the hole wide enough to completely spread out the plant roots, without crowding or bending them.
- Dig the planting hole deep enough so the plant, when set in the hole, will be at the level it was in the pot.
- Thoroughly clear any existing roots from the hole.
- Pile soil in a cleared area next to the hole. Take plant roots and grass clumps out of the soil that will be used to backfill the hole.
- Roughen the sides of the hole if they appear slick.
Preparing the Plant
Keep all plants cool and moist until planting. Do not store indoors!
The plants you purchased may either be in containers or they may have no soil around the roots (bare-root plants). See below for instructions on each kind.
For Potted Plants:
- Ensure the soil in the pot is moist, then tip the pot on its side and gently press on the pot to loosen the plant. Gently pull the plant by holding on to the base of the stem.
- Most plants will have roots exposed. Pull loose roots outward and cut or straighten any that are encircling the rootball (circling roots will continue to grow in a circle and cause the plant to grow poorly and possibly die).
- Place plant in hole and arrange roots so they point outward.
- Make sure the plant is placed at its original depth. Do not plant too deeply.
For Bareroot Plants:
-
- How to plant bare root plants in six easy steps!
- Keep the roots moist until planting by storing them in moist compost or soil. In addition, you may soak them in water for 1-2hours (never longer than 6 hours).
- Before planting, prune back any badly bruised, broken, kinked, or jagged roots to sound wood.
- Make a small mound of soil in the bottom of the hole.
- Arrange the roots around the mound so they all point outward from the plant.
- Place the plant so that soil covers the roots, but doesn’t cover the stem above the roots.
Replacing the Soil
- Backfill using the native soil that was dug out of the hole (or a hole nearby if more soil is needed). Do not fill hole with store-bought soil, this may cause the roots to extend only to the edge of the hole.
- Ensure that only soil goes back into the hole. No large rocks, sticks, clumps of grass, sawdust, leaves.
- Do not add any soil amendments (fertilizer or compost) to the planting hole.
- Push soil around the roots in the hole without disturbing root arrangement.
- Push soil down firmly to remove any air pockets.
- Use any extra soil to build a ring around the periphery of the planting hole to hold water and adjust the soil so that water drains away from the immediate trunk area. Gently pull the plant by holding on to the base of its stem.
Finishing Up
- Water the plant immediately to settle the soil and eliminate any air pockets. Add more soil to any holes that appear.
- If using compost or mulch, apply it to the top of the soil in a circle at least as wide as the roots, but not touching the stem.
Find out more about native plants
Explore our Native Plant Resources section for information on selecting plants, landscape planning, places to obtain native plants, and much more.